F5 iRule – JSession ID

The following is a simple iRule that provides persistence based on JSessionID that may be present in the incoming URI or within the Cookie:


when HTTP_REQUEST {

# Check if the JSESSIONID cookie is present
if { [HTTP::cookie "JSESSIONID"] ne "" }{
persist uie [HTTP::cookie "JSESSIONID"]

} else {

# Cookie wasn't set or didn't have a value, so check for the session ID in the URI
set JSESS [findstr [HTTP::uri] "JSESSIONID" 11 ";"]
if { $JSESS != "" } {
persist uie $JSESS
}
}
}

when HTTP_RESPONSE {

# Check if the JSESSIONID cookie is present in the response and has a non-null value
if { [string map {\" ""} [HTTP::cookie "JSESSIONID"]] ne "" }{
#log local0. "JSessionID in Response: [HTTP::cookie "JSESSIONID"]"
#log local0. "Set-Cookie: [HTTP::header values Set-Cookie]"

# Persist on the JSESSIONID cookie value for X seconds
persist add uie [HTTP::cookie "JSESSIONID"]
}
}

F5_JSessionID

The “string map” command is utilized in the HTTP_RESPONSE event as the value for the JSESSION ID may contain the quotes “” instead of just an empty string:

Timestamp: Rule jsessionid_persist_v2_rule : Set-Cookie: {JSESSIONID=""; Domain=host.domain.com; Expires=Thu, 01-Jan-1970 00} 00 {10 GMT; Path=/; Secure}

Name the above iRule and add it to the Universal Profile as shown here:

JSessionID_Profile

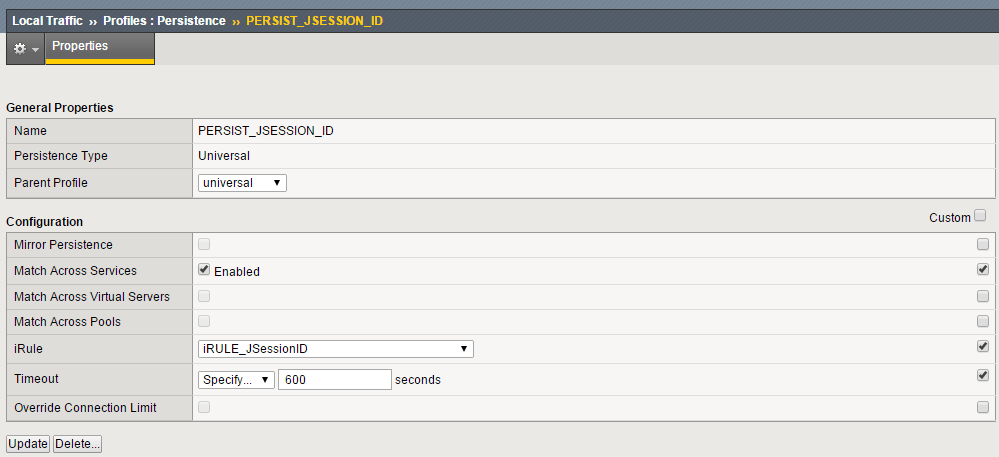
“Match Across Services” is enabled when you have two Virtual Servers for HTTP & HTTPS traffic and you require persistence across them – SOL5837

Please, note that for any persistence that involves the header of the incoming packet, we would have to terminate the SSL Certificate & Key on the F5 in order to enable it to read & manipulate the encrypted header.

Reference:

JSession ID

F5 CLI – TMSH & Bash

F5 has multiple command line access:

  • TMSH
  • Bash

From 11.x code version, F5 decided to focus future development only on tmsh. So, if you are trying to learn one of them, concentrate on tmsh. The cli is useful when we have to execute multiple commands within a short span of time like during a maintenance window.

Moving from TMSH to Bash:

root@lbal1(Active)(tmos)# run util bash

Moving from Bash to TMSH:

[root@lbal1:Active] log #tmsh

TMSH has the “(tmos)” in the prompt and the Bash CLI looks more like Linux prompt.

Reference:

K10272

F5 LTM – Logs

F5 logs can be seen here: /var/log/ltm

From TMSH, run the following command to move to bash:

root@lbal1(Active)(tmos)# run util bash

[root@lbal1:Active] ~ # cd /var/log
[root@lbal1:Active] log # cat ltm

/var/log/ltm has the logs for the past 24 hours. The logs available are rotated every 24 hours and past logs are stored under /var/log as: ltm.1.gz, ltm.2.gz etc

If you want to view the past logs, you can run the following command:

[root@lbal1:Active] log # zcat ltm.1.gz

Inline IDS, WAF & CDN

Consider the following scenario when we have IDS deployed in “promiscous mode” (not “inline” with the traffic) with the ability to “shun/block” any malicious traffic based on the Client IP in the incoming packet. For any normal Client-Server interaction, malicious client IP will be blocked by the firewall after the IDS detects the attack and informs the Firewall to block the Client IP.

new_vijay_file (1)

If the site is being accessed via a CDN like Akamai, the client IP will be an Akamai IP address and the original client IP will be included in “X-Forwarded-For” header.

What if a Client accessing a site via Akamai starts attacking the site ? The IDS can be configured to auto-block based on the “X-Forwarded-For” header instead of the actual Client IP field. The IDS signature may be triggered and the IDS may send a “block” command to the Firewall.  So, IDS will send “Block <X-Forwarded-For IP>” command to the Cisco ASA Firewall or Cisco IOS Router and this will be implemented as a “shun <X-Forwarded-For IP>” on the Cisco ASA.

However, the Cisco ASA Firewall can block based on the Client IP address field in the incoming packet and not based on the “X-Forwarded-For” header. Thus, the IDS auto-block feature can fail for this specific type of deployment. Of course, you can manually block it or use a WAF 🙂

new_vijay_file (7)

IDS – Intrusion Detection System

WAF – Web Application Firewall

CDN – Content Delivery Network

Load Balancing


ROUND ROBIN GIF

The above GIF shows a simplified Round-Robin load balancing method. In this load balancing method, the load balancer doesn’t care about the number of connections that are being handled by the server. The 1st connection is sent to the 1st server, 2nd connection to 2nd server and 3rd connection to 3rd server without any regard to the pre-existing connections.

Least Connections:

Least Connection GIF

The above GIF shows a simplified Least-Connections load balancing method. As the name suggests, the Load Balancer will send the connections to the server with the least number of connections.

In the initial state of the GIF, the servers, have 5,4,3 connections as noted. The 1st connection is sent to the server with the least number of connections – S3. The 2nd connection is sent to S2 as S1 has 5 and S2 & S3 are tied for number of connections at 4. The 3rd connection is sent to S3 as S1 & S2 have more number of connections (5) than S2 (4). In the last image, all the servers have equal number of connections at 5.

Brocade ADX – CSW HTTP Method

When using CSW Rule with POST method and load balancing based on incoming URI, you could run into a defect that prevents the right configuration. By default, “case-insensitive” CSW Rules would have to be added to “case-insensitive” CSW Policies. However, “case-insensitive” key word at the end of the CSW Rule for HTTP Method is NOT recognized by the Brocade ADX. Most browsers send the HTTP Method in Uppercase and hence, Brocade Engineers did not design the CSW Rule for HTTP Method to work with “case-insensitive” keyword.

Virtual ADX(config)#csw-rule “POST_Method” method eq “POST” case-insensitive

Virtual ADX(config)#csw-policy “CSW_POLICY” case-insensitive

Virtual ADX(config-CSW_POLICY)#match “POST_Method” forward 1

Rule “POST_Method” does not match policy “CSW_POLICY” case sensitivity type

What if you want to combine HTTP Method related CSW Rule (case-sensitive) with normal L7 load balancing rules based on case-insensitive URI ?

In this case, you can only create “case-sensitive” CSW Policy and not “case-insensitive” CSW Policy as the CSW Rule for Method doesn’t have a “case-insensitive” option. In effect, the URI that is utilized within the CSW Rule has to be “case-sensitive” and won’t match any case.

I wanted this configuration (case-insensitive):

csw-rule “POST_Method” method eq “POST” case-insensitive
csw-rule “URI_ADMIN” url pattern “/ADMIN/” case-insensitive
csw-rule “URI_STAGE” url pattern “/STAGE/” case-insensitive

csw-policy “CSW_POLICY” case-insensitive 
match “URI_ADMIN” forward 1026
match “URI_STAGE” forward 1026
match “POST_Method” forward 1027

Settled For This Configuration (case-sensitive):

csw-rule “POST_Method” method eq “POST”
csw-rule “URI_ADMIN” url pattern “/admin/” 
csw-rule “URI_STAGE” url pattern “/stage/” 

csw-policy “CSW_POLICY” 
match “URI_ADMIN” forward 1026
match “URI_STAGE” forward 1026
match “POST_Method” forward 1027

Issue seen: 12.4D code.

F5 Cookie Encryption

Create a new persistence profile with cookie name “MYCOOKIE”

ltm persistence cookie PROF_MYCOOKIE {
cookie-name MYCOOKIE
defaults-from cookie
}

Use the following iRule with the Virtual Server:


when CLIENT_ACCEPTED {
set COOKIE_NAME "MYCOOKIE"
set PASSPHRASE "Secret1234"
}

when HTTP_RESPONSE {
if { [HTTP::cookie exists $COOKIE_NAME] } {
HTTP::cookie encrypt $COOKIE_NAME $PASSPHRASE
}
}

when HTTP_REQUEST {
if { [HTTP::cookie exists $COOKIE_NAME] } {
set DECRYPTED [HTTP::cookie decrypt $COOKIE_NAME $PASSPHRASE]
if { ($DECRYPTED eq "") } {
# Cookie wasn't encrypted, delete it
HTTP::cookie remove $COOKIE_NAME
}
}
}

It is essential to understand that the cookie encryption is useful in masking the information about the F5 Load Balancer and the real-servers serving the content. If someone can capture the encrypted cookie, they can still use it for malicious purposes even without decrypting it.

You can utilize a different cookie name and pass phrase in the above iRule. Just remember to use the same cookie name in the iRule and in the cookie persistence profile

There are ways to implement cookie persistence using the HTTP profile in the F5 LTM. However, there can be issues with utilizing this as there is a bug that prevents proper functioning when the cookie name as a "." (period) in it.

Reference:

SOL4784

SOL12472

Brocade ADX – TCP Profile & Slowness

With the newer Brocade ADX code versions (12.4G+), it is possible to alter the TCP profile settings that is associated with the Virtual Server.

Why Change the TCP Profile:

I have run into issues when there is slowness in data transfer between the client and the Brocade ADX. Usually, I have seen this happen under 2 configuration setting:

  • CSW (Layer 7 rule is enabled)
  • SSL is terminated on the Brocade ADX

When we enable CSW or terminate SSL on the Brocade ADX, it tends to act as a “Full Proxy” device with TCP stack for Client-Side connection and another TCP stack for Server-Side connection. Somehow this setting will result in sub-optimal performance.

A sample TCP Profile:

tcp profile CLIENT_TCP
nagle off
delayed-ack off
rxbuf-size 524288
txbuf-size 2516544
tcp-wnd-scale 6

tcp profile SERVER_TCP
nagle off
rxbuf-size 2516544
txbuf-size 524288
tcp-wnd-scale 6

SSH@vADX(config)#server virtual VS-1.1.1.1

SSH@vADX(config-vs-VS-1.1.1.1)#port http tcp-proxy CLIENT_TCP SERVER_TCP

“CLIENT_TCP” profile changes the TCP profile setting that is client facing and the “SERVER_TCP” profile changes the TCP profile setting that is server facing. We can utilize the same TCP profile settings for both client and the server side, if required.

Ideally, I would recommend using 12.4U code version with the following TCP profile:

tcp profile TCP-PROFILE
delayed-ack off
rxbuf-size 1024000
txbuf-size 1024000
tcp-wnd-scale 4
tcp-timestamp on
tcp-sack on

The last 2 options for “timestamp” and “sack” are provided in 12.4U code version and are not available in earlier code versions.

The TCP profile can also be altered at the SSL profile level as noted here.

ssl profile star.domain.com
keypair-file star.domain.com-key16
certificate-file star.domain.com-crt16
cipher-suite all-cipher-suites
enable-certificate-chaining
tcp-profile TCP-PROFILE
session-cache off

In the above case, the TCP profile is added to the SSL profile and this will be attached to the Virtual Server. With newer code version, we can directly attach to the TCP profile to the Virtual Server’s port using the “tcp-proxy” keyword as illustrated earlier.

ADX – SSL Simple Health Check

By default, when we configure SSL Health Check for a Real-Server:

server real RS-web8 192.168.200.232
port ssl
port ssl keepalive
port ssl url “HEAD /”
port ssl status-code 200 200

The ADX will perform a simple SSL handshake. It doesn’t really check the content/status code. In order to force the ADX to check the content/status code, we would have to add this command globally:

(config)#no server use-simple-ssl-health-check

F5 Email Alerts

F5 has the ability to send out an email for various events like the failure of a pool member. For 10.x code version, Postfix within F5 can be utilized to send out emails. Beginning in 11.x code version, Postfix is not utilized. We would have to utilize SSMTP with mail-server: SOL13180

A Simple Step-by-Step Configuration Process (10.x Code Version):

  • Save the Existing Configuration & Create Configuration Archive before making any changes to the existing configuration.

Get CLI-TMSH access to the F5 device:

(tmos)#save sys config partitions all

  • Make sure F5 is configured with DNS Servers:

(tmos)#list sys dns

If there are no DNS Servers configured, add your DNS Servers and make sure F5 can access them:

(tmos)#modify sys dns name-servers add {1.1.1.1}

  • Make sure that PostFix is running from tmsh:

show sys service postfix
start sys service postfix
modify sys service postfix add
list sys service | grep regexp Boot postfix

  • Run a test email from F5 from bash:

echo test | mail
postfix flush
mailq

  • Using SNMP Traps:

Default SNMP traps are available under /etc/alertd/alert.conf

User Configured Alerts are set up here: /config/user_alert.conf

NEVER change the default SNMP traps file – /etc/alertd/alert.conf

The following default SNMP trap for pool member going down/up has been copied from the /etc/alertd/alert.conf file and then copied to /config/user_alert.conf file

cat /config/user_alert.conf will provide the following result:

alert BIGIP_MCPD_MCPDERR_POOL_MEMBER_MON_STATUS {
snmptrap OID=”.1.3.6.1.4.1.3375.2.4.0.10″;
email toaddress=”f5notifications@gmail.com”
fromaddress=”root”
body=”Member Status Change Notification – DOWN”
}
alert BIGIP_MCPD_MCPDERR_POOL_MEMBER_MON_STATUS_UP {
snmptrap OID=”.1.3.6.1.4.1.3375.2.4.0.11″;
email toaddress=”f5notifications@gmail.com”
fromaddress=”root”
body=”Member Status Change Notification – UP”
}

In the above alerts, “email toaddress” has been changed to the email address that is expected to receive the alerts from F5.

“fromaddress” is F5’s email address. Leave this at default settings “root”

“body” can be set to any information that needs to be conveyed.

After making the above changes, restart the alertd daemon from bigip bash & save the configuration:

bigstart restart alertd
b load
b save

In the above example, if you want to create customer alerts based on the logs: /var/log/ltm:

alert  "" {
   snmptrap OID=".1.3.6.1.4.1.3375.2.4.0.XXX"
}

In the above configuration, “log message” can be obtained from /var/log/ltm that you want to match in order to trigger the email. The SNMP trap OID with “xxx” at the end has to have a number greater than 300 for customer SNMP alerts for F5.

Gotchas:

Make sure to create relevant PTR record for the F5 in order to prevent the emails from being marked as SPAM

Emails can sometimes get queued for a long time on the F5 and consume all the memory on the F5. In order to prevent this, the “queue_minfree” has to be changed to something else from the default zero:

Default is no memory limitation:

# postconf -d | grep queue_minfree

queue_minfree = 0

10M Bytes of storage is provided by the following command:

# echo “queue_minfree = 10000000” >> /etc/postfix/main.cf postconf -e “queue_minfree = 10000000”

Reference:

SOL3727